It’s frustrating that the recommended method subtly differs depending on the hose end manufacturer and shape. Or rather, “This should be announced more prominently.”
Learning the manufacturer’s official method for making hoses really boosts your confidence level.
Today’s Technical Thoughts & Mechanism Insights
Theme:Assembly of EARL’S Mesh Hose & Fittings.
Question about the official procedure: After pushing the hose all the way into the socket, why does the manual instruct you to “back it off by 1.5mm to 3mm (depending on specifications)”?
Physical reason: As you thread the cutter (nipple) into the socket, the inner core (rubber or Teflon) gets pushed forward, and the blade inside shifts slightly. Without initial clearance, the inner material buckles and breaks, or damages the fitting, causing catastrophic oil leaks.
Shop owner’s note: It’s the same as press-fitting a bearing to a precise depth. When assembling machinery, you must predict how the metal will move, and prepare the proper crush allowance and clearance in advance—that’s the foundation of everything!
Another BLOG by Decoboco. “RURAL GARAGE“
A hidden room beyond motorcycles. Sharing everyday convenience items, relocation, delicious food, life philosophy and more. ←click
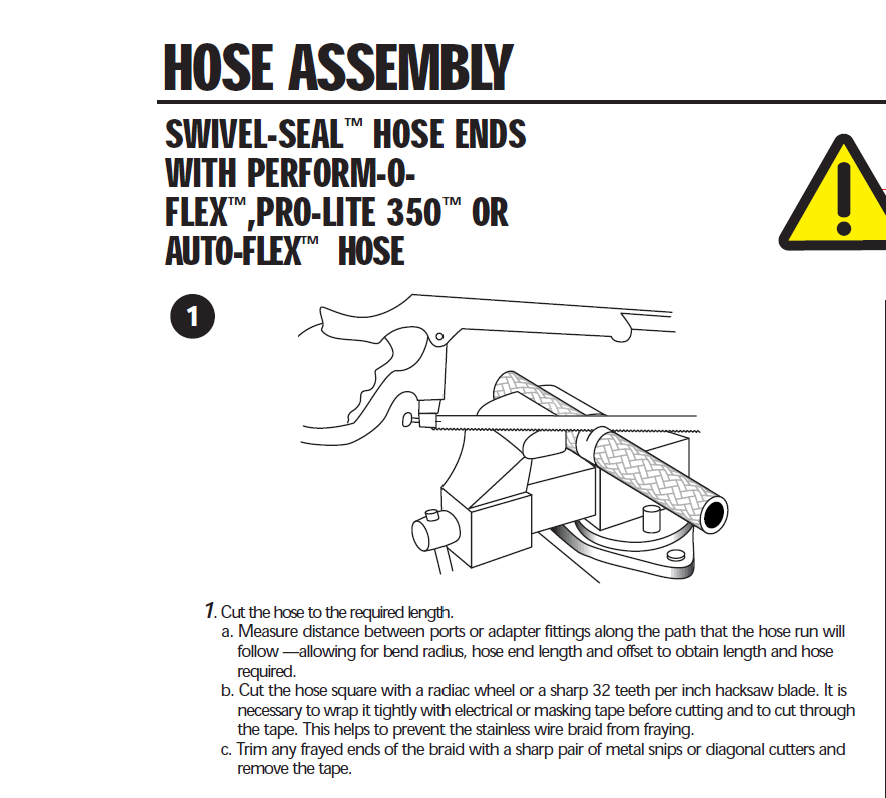
Measure the distance between ports (connection points) or adapters along the hose routing path. Consider the bend radius, hose end length, and offset clearance to determine the required hose length.
1-b. Cutting at a Right Angle
Use a high-speed cutting machine (radial well) or a fine-toothed hacksaw (32 teeth/inch recommended) to cut the hose at a perfect right angle (square).
【Important】 Before cutting, wrap the cut area tightly with vinyl or masking tape to prevent stainless mesh fraying, and cut through the tape as well.
1-c. Finishing
If there are any frayed edges on the mesh, trim them neatly with sharp metal shears or nippers, and remove the wrapped tape.
Step 2: Inserting into Socket and Marking (※This is the key point)
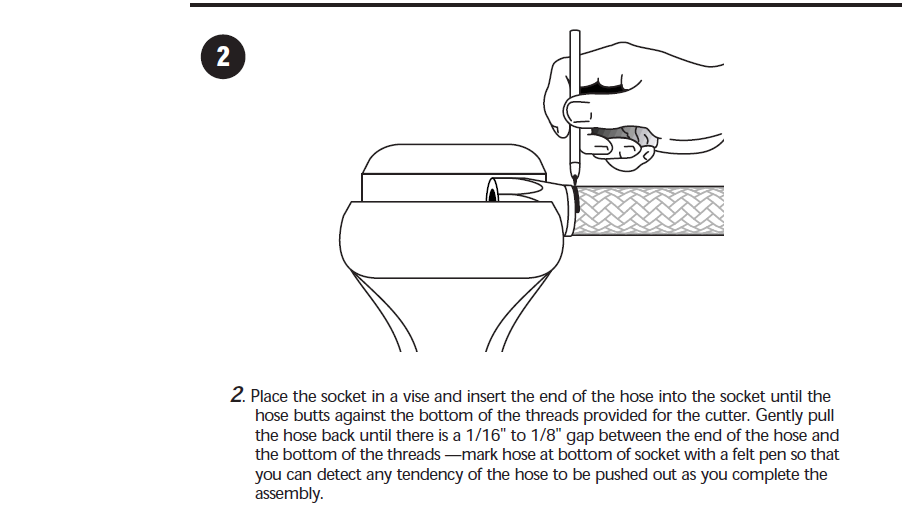
Secure the socket in a vise (using an aluminum collar or similar).
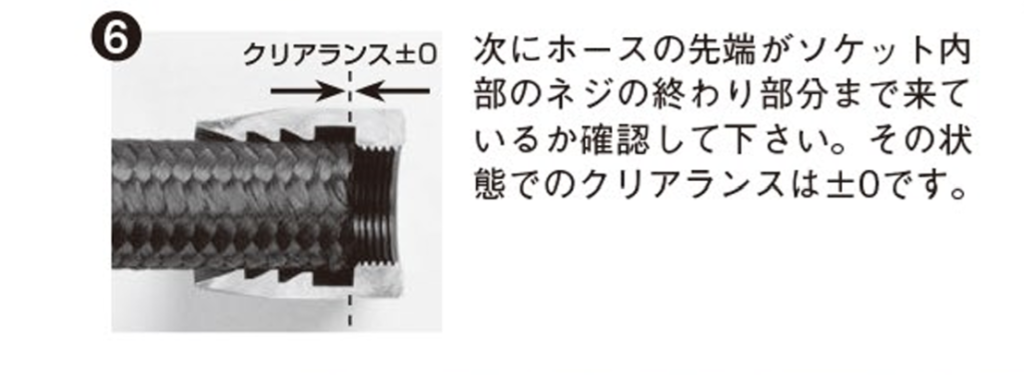
Insert the hose end into the socket and push firmly until it bottoms out against the nipple (cutter) thread base.
【Important】 Gently pull the hose back until a gap of “approximately 1.5mm to 3mm (1/16″ to 1/8″)” forms between the hose end and the thread base.
To monitor whether the hose gets pushed out (pulled out) during assembly, mark the hose with a felt pen (white pen, etc.) aligned with the socket’s edge.
Step 3: Applying Lubricant
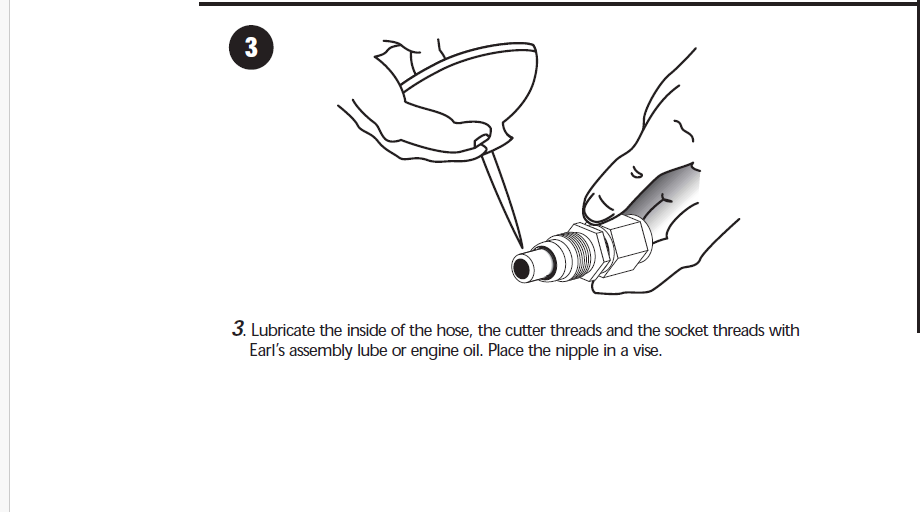
Apply EARL’S genuine assembly lube or clean engine oil generously to the hose interior, the nipple (cutter) threads, and the socket threads.
Secure the nipple (fitting body) in a vise.
Step 4: Initial Threading
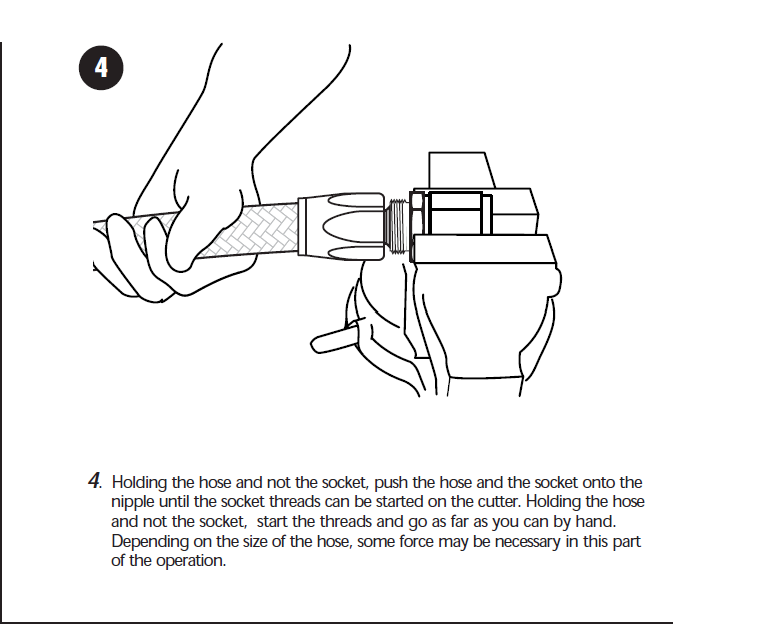
【Important】 Grip the “hose body” itself, not the socket. Push the hose and socket together into the nipple until the threads engage.
Continue gripping the “hose body” itself and hand-tighten the threads as far as you can.
※Depending on hose size (gauge), this step may require considerable force.
Step 5: Final Tightening and Gap Management
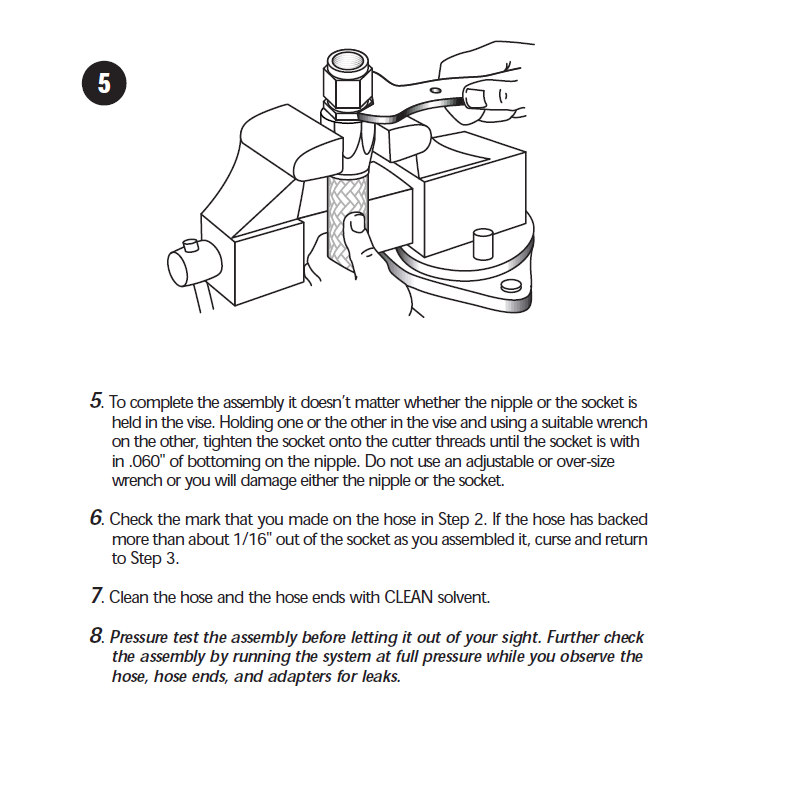
For final tightening, you can secure either the nipple side or socket side in the vise. Fix one side and apply an appropriately sized wrench (such as an aluminum wrench to avoid scratching the anodize) to the other.
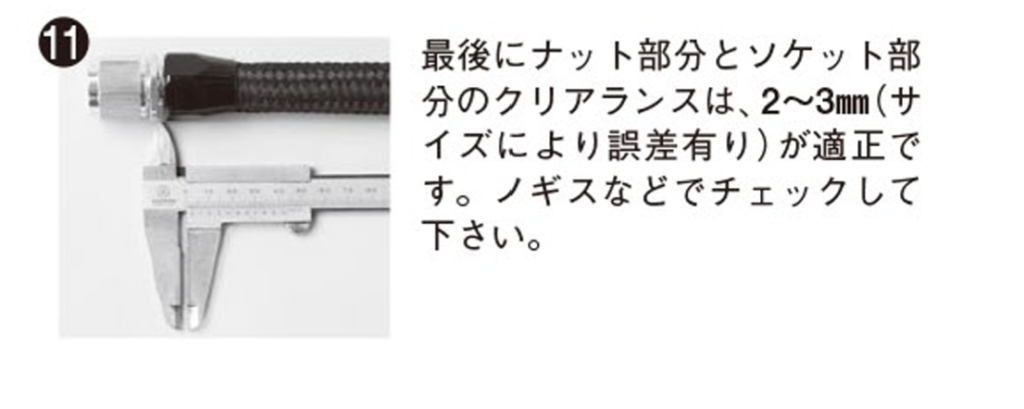
Tighten the socket until the nipple hex and socket bottom out with “approximately 1.5mm (0.060″) clearance” remaining.
⚠️ 【Warning】 Never use an adjustable wrench or an incorrectly sized wrench. This will damage the nipple or socket (crushing or cracking the corners), causing catastrophic oil leaks.
Step 6: Checking for Hose Slippage
Check the “mark” you made on the hose in Step 2.
If the hose has been pushed out (pulled out) from the socket by “approximately 1.5mm (1/16″) or more” during assembly, curse and start over from Step 3.
※The cutter hasn’t bitten correctly inside, and the hose has escaped.
Step 7: Cleaning
Clean the assembled hose body and hose ends thoroughly with clean parts cleaner (solvent).
Step 8: Final Pressure Test
Before taking it out of your sight (before final vehicle installation), always perform a pressure test on the assembly.
Additionally, while operating the system at full pressure, carefully inspect the hose body, hose ends, and all adapters visually for any oil leaks.
That clears things up nicely. You’re perfect from tomorrow on!
Mechanical Thoughts & Technical Insights.
Subject: Decoding the “1.5mm to 3mm Back-Off” rule in EARL’S Hose Assembly instructions. Details: Happy Friday night from the Decoboco tech bay! For our third entry today, we dive into a hyper-specific, crucial nuance of building custom oil and brake lines using industry-standard EARL’S aluminum fittings and braided hoses. Standard official manuals instruct you to push the hose completely into the socket until it bottoms out, but then explicitly command you to “back it off by 1.5mm to 3mm” before tightening the cutter nipple. Why? As you thread the cutter into the socket, the mechanical friction forcefully pushes the inner rubber/teflon core forward. If there is zero clearance at the bottom, the inner tube buckles, structural wrinkles form, and micro-cracks develop—leading to catastrophic fluid leaks under high pressure. Verdict: Leaving that tiny 1.5mm to 3mm clearance allows the compressed hose room to expand naturally, achieving a flawless, uniform seal with the internal brass olive. True mechanical calibration isn’t just about screwing parts together; it’s about predicting how materials behave under stress and engineering the perfect layout beforehand!





 ポチップ
ポチップ